OPNsense Essentials: A Beginner's Guide to Firewalls
Basic to Advanced Configurations for OPNsense like setting up port forwarding, static IPs, and more!
OPNsense has been one of my most favourite firewall for quite some time now and it currently fulfills all my homelab and business needs. This article is meant to be a guide for anyone getting started with OPNsense, and is looking do both basic and complex things with thier firewall.
So, whether you’re a home-lab enthusiast or gearing up for business-level security, this guide will walk you through the essentials of OPNsense, helping you set up, configure, and navigate its features with ease whether you’re diving into the basics or exploring more advanced configurations.
Static IP
A static IP is like giving your device a permanent address on your network. So, whenever your machine asks the DHCP server for an IP, it will always get the one you have configured for its Mac address. If not set, the DHCP server will assign a random IP from the available range. This is not necessarily a bad thing, but a nightmare if you wanna set up port-forwards, or do anything of that nature.
Before we begin, let’s grab the Mac address of your device!
Go to `Services > DHCPv4 > Leases`You will see a huge table of all connected devices, their IP address, Mac addresses, and host names. Often times you would be able to identify your device using the hostname, otherwise you need to check the IP on your device and check it against the table for its Mac address.
Now that we have a Mac address, let’s go ahead and set a static IP!
1. Go to `Services > DHCPv4 > LAN`.
2. Scroll to the bottom and click `+` icon under `DHCP Static Mappings for this interface` section.
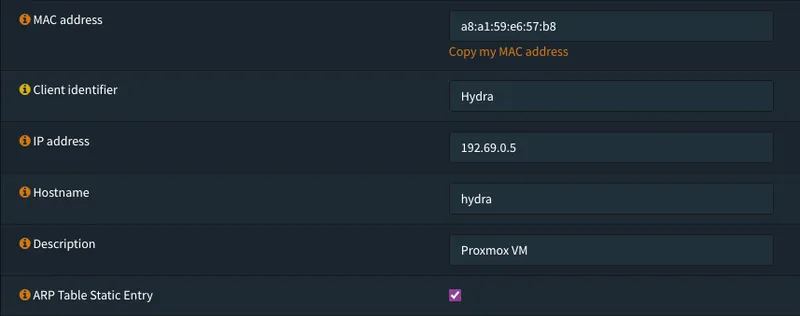
3. Fill in the following details:
- MAC address: [Enter MAC address]
- Client identifier: [Enter client identifier]
- IP address: [Enter the desired static IP]
- Hostname: [Enter a hostname for the device]
- Description: [Add a brief description]
4. Enable `ARP Table Static Entry`.This is how it should look in the end.
Now click Save and we are done! Now you can simply restart your device to get a static IP!
Port Forwarding
Port forwarding might sound a bit technical, but it’s actually pretty easy! You can use it to expose internal services on your network to the internet. It’s like setting up a direct path for internet traffic to reach a specific device or service in your network, allowing you to host websites, run game servers, or access specific services from anywhere on the internet.
Here’s how to make it work!
1. Go to `Firewall > NAT > Port Forward`
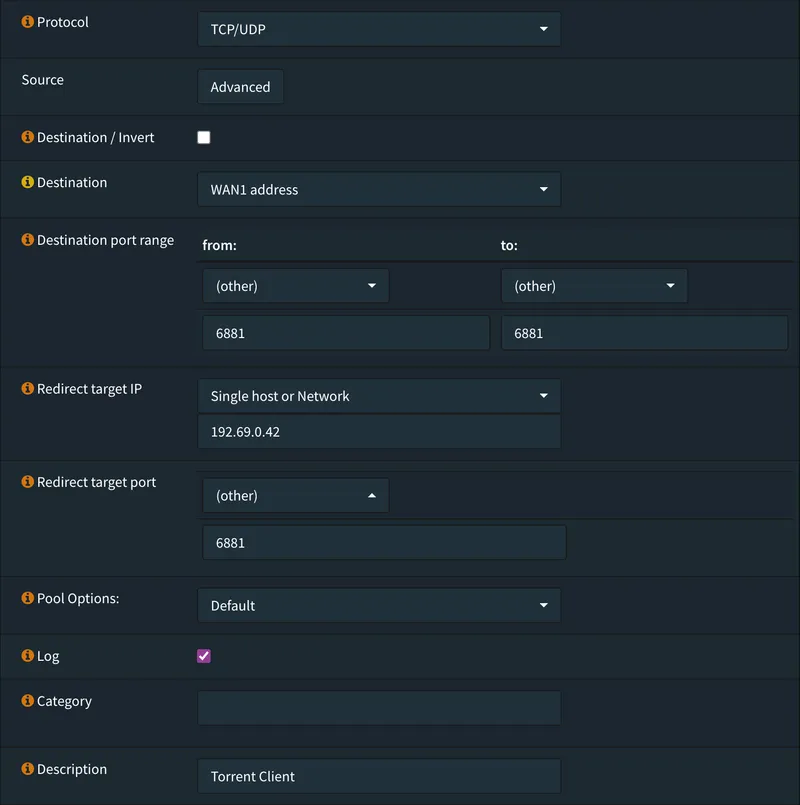
2. Click `+` icon to add a new rule
3. Set `Protocol` to `TCP/UDP`
4. Set `Destination` to `WAN address`
5. Set `Destination port range` according to your desire
6. Set `Redirect target IP` to the IP of your local machine hosting the service
7. Set `Redirect target port` to the port number of the service
8. Enable `Log`
9. Add a `Description`This is how it should look.
Now click Save and we are done!
After this, your internal services should be accessible via. your public IP. However, you may still encounter issues when trying to access them from inside your local network. To resolve this, you’ll need to change some additional NAT settings.
1. Go to `Firewall > Settings > Advanced`
2. Enable `Reflection for port forwards`
3. Enable `Automatic outbound NAT for Reflection`
This would give OPNsense more clarity on how to map internal requests to external services hosted inside the network.
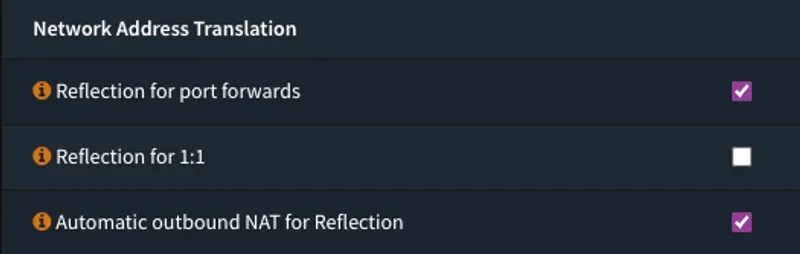
Now, click Save to apply the settings.
Update
Keeping your firewall up to date with the latest security patches is essential for defending your internal network against various vulnerabilities, provided you have configured everything correctly.
Updating is quite simple. Just follow these steps:
1. Go to `System > Firmware > Status`
2. Click `Check for update`
It’s worth noting that some updates may require a full reboot of the firewall. Therefore, it’s recommended to perform updates when you are comfortable with your services going down for a few minutes.
Remember, staying current with updates ensures that your firewall is equipped with the latest security measures, safeguarding your network from potential threats.
Enjoyed reading?
Feel free to follow or reach out to me on Twitter
Next up
Markdown Cheatsheet
This blog serves as a handy reference and a demonstration of the art of crafting Markdown files

Docker Crash Course for Beginners
Breaking down the must-know container tricks, installation hacks, and commands that make deploying apps a breeze.